This guide covers how to make a network connection to your pi-top from another computer to use interfaces such as VNC or Further Link coding. For this you will arrange a shared network with the pi-top and then access the pi-top using it's IP address. There is also a Bluetooth connection method available for the coding connection from Further, and HDMI monitor connections for accessing the desktop.
If you're booting up your pi-top for the first time, please visit this page to get started.
If you don't have another computer to connect from and want to use your pi-top standalone with a monitor, keyboard and mouse then you can skip this guide - the connection should already work from the pi-top desktop.
Several methods to make the connection from another computer to your pi-top are listed below. Usually it's best to start with a cable or the 'AP' WiFi hotspot and then if you want you can use that connection to transfer the pi-top to your regular WiFi network for added convenience. If you have a screen and keyboard connected to your pi-top you could add to to your regular WiFi network straight away.
After you're connected with your pi-top, you'll need it's IP address to access it. You can find this in the pi-top's Miniscreen menu, it's a set of 4 numbers separated by dots such as 192.168.1.1 or 172.10.3.5.
To test the connection, enter your pi-top's IP address into your browser's address bar. This should load the pi-top's web portal interface. In some cases you may also be able to access this with the url pi-top.local .
Using your pi-top as a Wi-Fi Hotspot / Access Point (AP)
The first time you boot up your device, it will broadcast a Wi-Fi network that you can connect to. The Miniscreen of the device will guide you through the steps required to connect to it, including the network name (Should be something like 'pi-top-XXXX') and password. Once you're connected, it's required that you complete a small onboarding to configure your device.
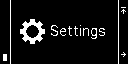
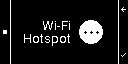
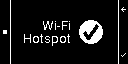
If you already completed the first-boot onboarding, you can continue using your pi-top as an Access Point. You'll need to activate this mode using the Miniscreen application. Go to the 'Settings' menu and scroll down to the 'Wi-Fi Hotspot' entry. If the circle at the right-hand side has a tick, it means that this mode is already enabled, so you can continue to the next step. If it has a cross, press the 'Select' button to enable it.

To learn the Access Point network name and password, go back to the main miniscreen menu using the 'Cancel' button. Then, navigate to the 'Network' menu and scroll down to 'Wi-Fi Hotspot'. You should see the network name at the top, the password at the middle and the device IP address at the bottom. Now using your computer, connect to this network using the credentials provided.


Once you're connected, you can use the device IP to connect to the device.
Using a pi-top USB or Display Cable
If you have the grey pi-top USB cable, follow this guide to connect your computer with the pi-top[4].
If you have the green Display Cable with adapters, follow this guide instead.
Using your existing Wi-Fi network (e.g. School or Home network)
This is the recommended method, since it will give full functionality to your pi-top and allow software updates. However you will need to first use one of the other connection methods to access the Wi-Fi configuration pages.
See the Wi-Fi Connection Guide.
Using an Ethernet cable
To connect through a wired connection, first plug in your ethernet cable into the ethernet port of your pi-top [4]. To learn the IP address of the device using the miniscreen, navigate to the 'Network' menu and scroll to the 'Ethernet' entry.
You can use the displayed IP address to connect to the pi-top. 
If this method does not work you may need to install additional Windows drivers using this guide.
Make sure that both your pi-top [4] and your device are connected to the same network when using this IP address to access to the pi-top.
Using Bluetooth
You can also connect to your pi-top using Bluetooth. This type of connection allows you to run code from Further but will not give you access all features such as VNC and the Web Portal.
Please follow this guide for making the Bluetooth connection from Further:
Connect and Run Code from Further using Bluetooth